Data Science Platform Integration with BranchKey
 Robbert, 12 May 2022
Sharing your data is not always possible. With distributed training there is a solution that enables you to train models together with other organizations without sharing your sensitive data.
Recently BranchKey ran a distributed training project on the AskAnna platform using their federated learning environment. We connected multiple private organization datasets together to build a Federated solution.
A big thanks to Diarmuid Kelly for setting up this integration and learning me more about federated learning. And of course for writing this integration guide for the BranchKey and AskAnna platforms.
The article below was orignally posted on Branchkey’s blog.
BranchKey ↔ AskAnna || Data Science Platform Integration
In this integration we want to demonstrate how an organization can setup a BranchKey agent & client. Next, it demonstrates how an organization can use AskAnna to setup a project, configure a job that trains a model on the BranchKey server. In the configuration section you see how you can track metrics, result and artifacts of a run in AskAnna.
BranchKey is a platform that empowers you to setup federated learning environments. This allows data scientists to work together for delivering better services and products, without the need of sharing (sensitive) data.
AskAnna is built to support data science and machine learning teams to run, track and reproduce data science jobs. AskAnna makes it easy to setup a job that you can run on a server. It logs all activities so you can trace back what you did. And you can easily share your achievements with your team.
How to setup BranchKey Leaf-Nodes
To get access to the BranchKey API, first create a free account on our web-application. It’s now possible to log in to your Branch Management dashboard. On this dashboard you’ll create a branch for the federated learners, or leaf-nodes, to connect to. When configuring your branch just make sure to set the aggregation target to the number of datasets you wish to deploy over.
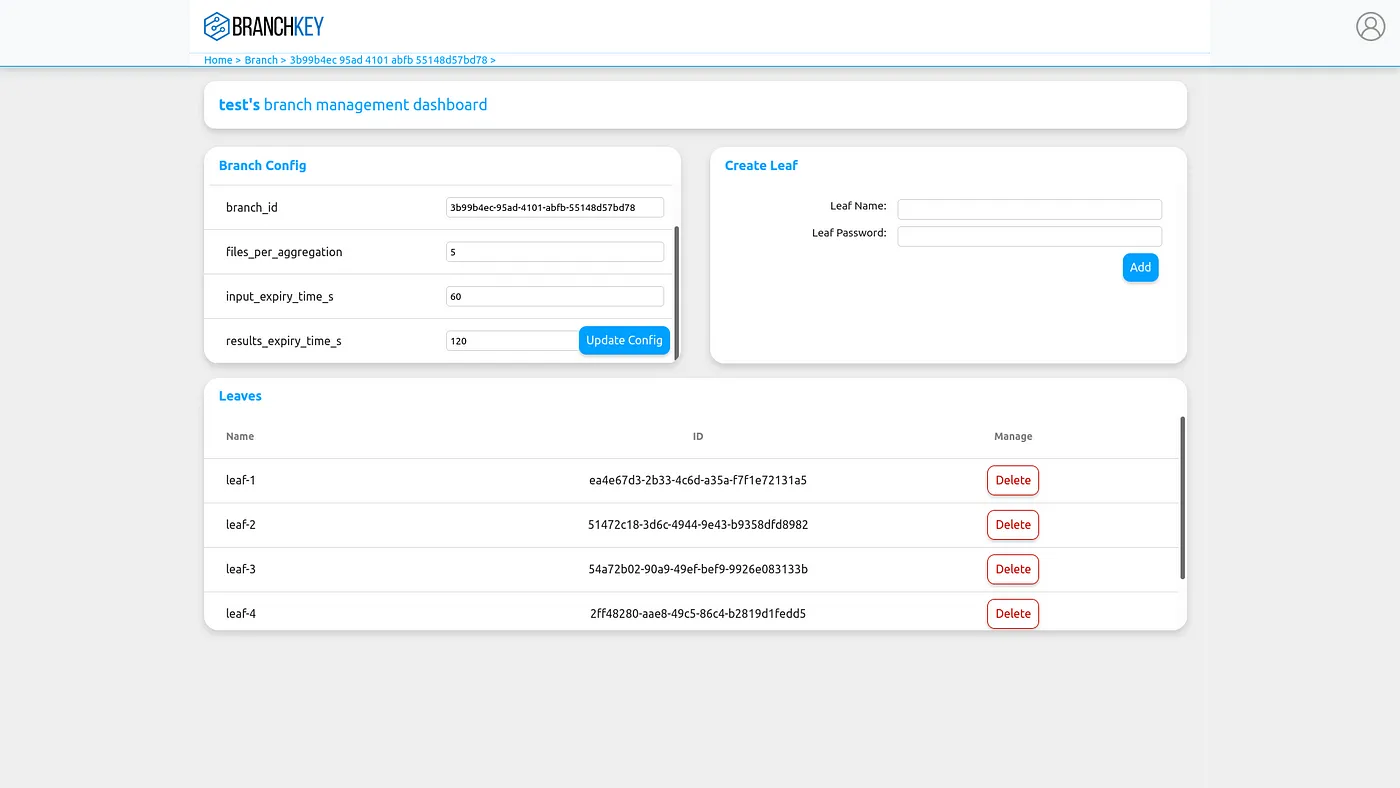
Now that you have a Branch and an aggregation target set, create x number of leaf nodes attached to this branch. Make
note of a few details on this branch management page: tree_id, branch_id, leaf_name(s), leaf_password(s).
You’re ready to install the BranchKey client from pip install branchkey. Setting up an individual client is
straightforward, for the most up-to-date documentation and support see the
PyPi readme or check our docs. Using the details
mentioned above a single client can be initialised as such:
from branchkey.client import Client

credentials = {
  "leaf_name": "guest",
  "leaf_password": "abc123",
  "tree_id": "tree-1",
  "branch_id": "group-1",
}

# initialise the client
c = Client(credentials)

# login and authenticate your credentials
c.login()
A very nice feature of the AskAnna platform is their project variables, later
we’ll show how to use these to configure leaf_name, leaf_password, tree_id, and branch_id as project variables
that get injected at runtime rather than hard coded. For now, we’ll look at how to set up multiple clients and then run a job on AskAnna.
How to setup a BranchKey Training Run
To start a training run we need to extract the model parameters to send to the BranchKey server. As there are many ways to build a model, and the BranchKey system is model agnostic, we won’t go into detail here on how to build a model or any specific dataset requirements. Although outside the scope of this integration guide, an example from Pytorch’s documentation is a good place to get started and we’ll use Pytorch as our example here.
We’re going to use a Breast Cancer detection problem in this guide with a Logistic Regression Model to try predicting benign or malignant cases across 5 different private organisations who cannot share data. We perform standard data normalisation and from the 30-feature dataset select the 4 most significant based on their p-value score to build our model.
class LogisticRegression(torch.nn.Module):
  def __init__(self, input_dim, output_dim):
    super(LogisticRegression, self).__init__()
    self.linear = torch.nn.Linear(input_dim, output_dim)

  def forward(self, x):
    return torch.sigmoid(self.linear(x))

model = LogisticRegression(4,1)
model.to(device)
criterion = torch.nn.BCELoss()
optimizer = torch.optim.Adam(model.parameters(), lr=.003)
Simplifying a little, we have now a model and a dataset cleaned and ready for learning. The full dataset gets split over 5 organisations (which we will set up in AskAnna in the next section). For the training epochs of a model, we iterate as usual over our dataset, albeit now at 5 different locations. The steps go something like this:
- Each Leaf fits their local model to their private fraction of the whole dataset.
- Each Leaf extracts the parameters from their local model and sends it to the BranchKey server.
- The BranchKey server performs an aggregation of all leaf node parameters when the target we defined earlier is reached.
- Each Leaf is notified of the completed aggregation and is now able to download the aggregated parameter file.
- Finally, the Leaf loads these received parameters into their local model and continues to the next pass of their local training dataset.
A more involved example demonstrated in Python is shown here:
for epoch in (1000):
  m.run_model(test={'x': X_test.to(device), 'y': Y_test.to(device)},
  train={'x': X_train.to(device), 'y': Y_train.to(device)})

  ####################
  # Aggregation Step #
  ####################
  params = []
  for name, param in m.model.named_parameters():
    params.append([name, param.cpu()])
    m.model.to(device)

  update = client.convert_pytorch_numpy(params)
  with open(f"./output_parameters/{epoch}-weights.npy", "wb") as f:
    np.save(f, update)

  client.file_upload(f"./output_parameters/{epoch}-weights.npy ")

  if not client.queue.empty():
    mesg = json.loads(client.queue.get(block=False))
    client.file_download(mesg['aggregation_id'])
    new_params = np.load("./output_aggregated/" + mesg['aggregation_id'], allow_pickle=True)

    for param, new_param in zip(m.model.named_parameters(), new_params):
      param[1].data = torch.from_numpy(new_param)
      m.model.to(device)
When this run completes the Leaves at each individual organisation have collaborated to build a model without sharing any data. We produce graphs of the results which will be made available in the AskAnna run history. In the next section of this guide, we’ll explore how to set up these organisations in AskAnna and automate the training process.
How to setup AskAnna to train a model in BranchKey
After you have signed up for an AskAnna account, you can create a new project. For
this demo we use the AskAnna CLI and install it via pip install askanna. First,
make sure you are authenticated:
askanna login
Now it’s time to create a new project. Go to the local project directory, and run:
askanna init
After successfully initiating a new project, you find a new file in the project directory: askanna.yml
In this file you can add a new job to train a model on the BranchKey agent:
train model:
  job:
    - pip install -r requirements.txt
    - python train.py
  output:
    result: final_aggregated_params.npy
    artifact:
      - accuracy.png
      - output_parameters/
      - output_aggregated/
The first element is the name of the job and in the following lines we define the job. For this job, we want to save the final trained model as a result. Additionally, we want to save the performance graph result.png and the in-between output for each epoch as an artifact. To setup authentication in a secure way see the next section.
Authentication
In the demo project there are login credentials containing sensitive information needed to setup the authentication to the Branchkey client. We could keep these credentials in the code package, but it’s more secure to use AskAnna project variables. You can use the CLI to add the variables:
askanna variable add
Add the variables with the names LEAF_NAME, LEAF_PASSWORD, TREE_ID and BRANCH_ID and the corresponding values
for the organisations. Make sure that variable LEAF_PASSWORD is set to masked.
Allowing for the code to read the login details from the run environment variable you should slightly modify your code:
import os
from branchkey.client import Client

credentials = {
  "leaf_name": os.getenv("LEAF_NAME"),
  "leaf_password": os.getenv("LEAF_PASSWORD"),
  "tree_id": os.getenv("TREE_ID"),
  "branch_id": os.getenv("BRANCH_ID"),
}

# initialise the client
c = Client(credentials)

# login and authenticate your credentials
c.login()
This removes us having to store any credentials on the code level and allows us to replicate the same code across organisations, injecting the credentials on the project level for security and simplicity.
Tip: for local development environment variables or not really user friendly. You can use the Python package dotenv, save the credentials in a .env file, add the filename to askannaignore and add the next two lines to your code:
from dotenv import find_dotenv, load_dotenv

load_dotenv(find_dotenv())
Tracking metrics
In AskAnna we can track metrics of every train run. This is optional, but it can help you to compare multiple runs. Or to log the meta data of a single train run that can help you to reproduce a result.
In the Python script that runs the training procedure we add some lines. First, we make sure we import the AskAnna SDK:
from askanna import track_metrics
Next, after every iteration we store the result accuracy, loss, accuracy_test and loss_test:
track_metrics(
  metrics={
    "accuracy": results[-1]["accuracy"][0],
    "loss": results[-1]["losses"][0],
    "accuracy_test": results[-1]["accuracy_test"][0],
    "loss_test": results[-1]["losses_test"][0],
  },
  label={
    "epoch": epoch ,
  }
)
Start a run
Now everything is setup and configured, it’s time to train a job on the BranchKey agent. Start the train run via:
askanna run train-model --push
With this command you start a job run and via --push we upload the latest version of the code to AskAnna.
Now, when you go to the AskAnna project you can look-up the job you just created and expand the row to find the run you just started.
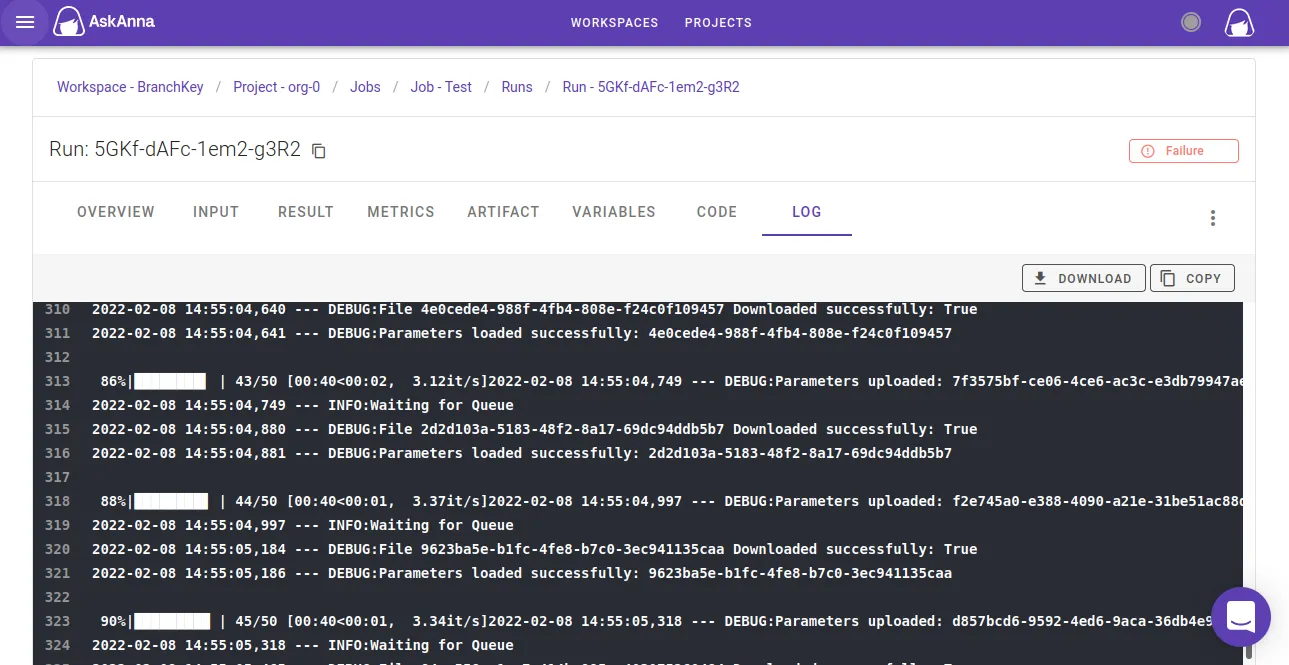
While the job is running, you can use this page to check the log and see the progress. Or if something goes wrong you can use the log for debugging:
When the run finished, you can find back the meta information, result, metrics and artifact on the run page:
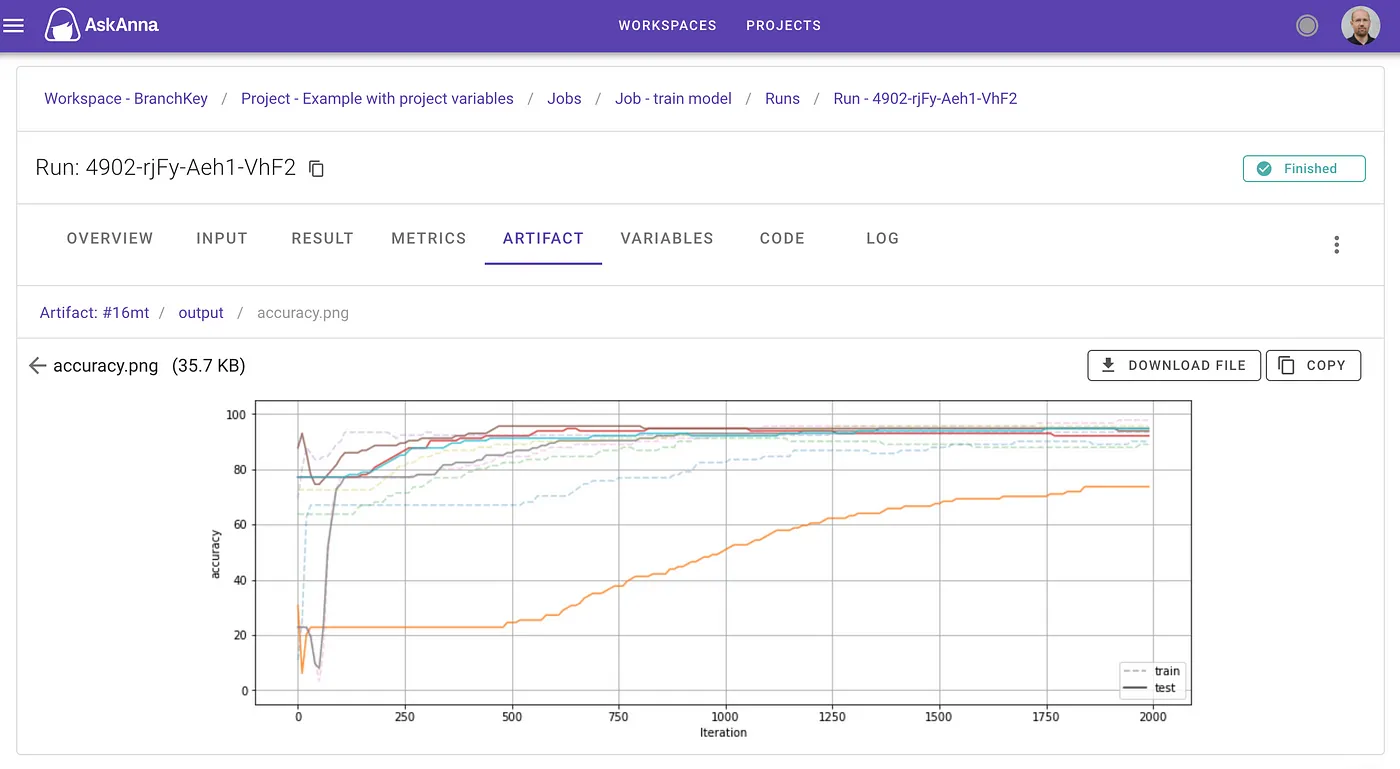
The above graph is the result of multiple private datasets solving their local problem without federations. Each finds their owns solution and takes some time to converge. Compared against the graph below where the BranchKey system is used, we see a much faster convergence and shared solution found across each of the organisations private training set. Importantly here, no data was sent from these private organisations.

Use the trained model
Now you have trained a model, you can use the trained model that is saved as the result of the run for other Python projects or to setup a serve job. An example of how you can use the result:
import askanna
import numpy as np

latest_run = askanna.run.list(job_name="train-model", page_size=1)[0]
params = np.loadtxt(askanna.result.get(latest_run.suuid))
Weekly update
Once you have a model that is used in production, you probably want to frequently retrain the model. With BranchKey and AskAnna this is easy. For example, if you want to weekly retrain your model you only have to add the schedule to the job definition:
train-model:
  job:
    …
  schedule:
    — "@weekly"
AskAnna schedules a weekly train run on the BranchKey server and stores the result in AskAnna. Here you can find back when the last train run happened, which version of the code was used and the metrics for that train job.
Like what you see here?
There are a lot of features we couldn’t give the coverage they deserve in this post.
Want to try out BranchKey? Register a free account at app.branchkey.com or send us an email [email protected].
More about AskAnna on the website or check the documentation including more examples. Want to try it out? Sign up for a free AskAnna account.